
My very first year as a chemistry teacher, I didn’t have a chemistry lab. So I tried my hardest to come up with as many “no chemical” chemistry labs as I could. In my search I came across quite a bit of criticism from other chemistry teachers. Yes, I know that there really is no such thing as a chemical free anything. Air and water are chemicals. You and I are walking, talking bags of chemicals. The whole “no chemical” concept is truly a silly one.
But the educational criticisms I was reading were really disheartening. Things such as “no self respecting chemistry teacher would ever attempt a “chemical free” lab.” They “rob” the kids of an authentic chemistry experience. And of course, it made me feel like a bad teacher. But after six years of working with “chemical free” labs – both with and without lab rooms to work in, I can tell you that’s not true.
Our hands are tied enough as teachers. We don’t need any extra negativity around our jobs! Of course, when you can get the kids in a lab, and do it safely, that should be option A. But when you have to (or even when you just want to) no chemical chemistry labs can really meet the same educational need.
So in the name of getting scrappy and doing whatever you need to to make sure that your students are successful, here are a few of my favorite no chemical chemistry labs that you could easily do in your kitchen!
1) Gold Foil Experiment
Teaching in New York, the Gold Foil Experiment was guaranteed to show up each year on the state final exam. And it was really hard to visualize. The atom is mostly empty space? How? Our entire world is made up of solid objects!
In this lab, I created a hula hoop model. The hoop represents one gold atom. Suspended in the middle is a ball that represents the nucleus. My students throw ping pong balls at it which represent the alpha particles Rutherford launched at the Gold Foil. (You could totally use balled up paper.) Our results are very different from Rutherford because our proportions are totally wrong. But that’s okay, it leads to good discussion.

We classify a hit as the ping pong ball hitting the nucleus. A deflection is hitting the hula hoop, and a miss is when the ping pong ball goes straight through. We compare to Rutherford’s data, and kids get a really good idea of how the data yields the specific results. Read more details here.
2) Average Atomic Mass
This is a fun no chemical chemistry lab for sure. I usually use movie theater boxed candy I get from the dollar store. I pick out three types of candy that are different in mass (this changes every year.) You could do three different masses of pretzels, coins or even dried beans. Treat each as an isotope of the same element. Students will determine the percent abundance by counting (because what high school has a mass spec?) And then they will find the mass of each isotope. Then they calculate the average atomic mass.
I usually like to have a small amount of the heavy isotope and a large amount of the small isotope. This really gets the kids to understand that percent abundance is really the deciding factor on the results of the average atomic mass. Read more details here.
3) Periodic Table Guess Who
This is a great game that I like to fill up a day on my schedule. Usually periodic table falls in October for me, so having a Halloween (or day after) day to play a periodic table game is easier than trying to teach them something new.
In this game, students work with a list of elements and have to pick one. They have a partner and ask yes or no questions to try to determine their element. First one to figure out the other’s element is the winner. You can have students play multiple times. It’s great practice in identifying elements based on their properties. You can get the no chemical periodic table guessing game lab with this link!

4) Penny Drop
A lab as old as time! In this “chemical free” lab students drop substances onto the surface of a penny to test the strength of an intermolecular force in relation to surface tension. Typically I use water, rubbing alcohol and some kind of oil (vegetable or baby oil). The thing I love about this lab is that you can really use whatever you have. I’ve even done it with soapy water and salt water. You’d be surprised by the results! The salt water does not have an added advantage of molecule-ion attraction compared to the water. The salt ions will actually hinder the hydrogen bonding!
5) Like Dissolves Like
This is one of my most popular labs, and I first used it in my no chemistry lab situation. Students should know that water is a polar molecule. Then they mix other substances with the water to determine if they are polar or nonpolar. You can do this with literally ANYTHING! You can use things from your stock room, or things from your kitchen pantry. Some of my favorites are: vinegar, vegetable oil, baby oil, rubbing alcohol, food coloring and even my homemade aqua sand! You can get as “no chemical” as you want for this lab activity. Maybe even try some solids, like sugar or salt. If it dissolves, it must be polar (or a super large nonpolar molecule with lots of dispersion forces). Read more details here.

6) Counting by Weighing
This lab really is as no chemical as it gets. In an effort to get students to understand the mole concept they start counting objects by weighing them (same that we do for atoms). I create what I call a “Reavy bundle” of so many items. This year I chose 8. Then I tell students “there are 16 Reavy bundles of paperclips in this beaker. What is the mass of one paperclip?” The beaker’s contents are in a plastic shopping bag (though you could use just a paper bag and ditch the beaker). Doing this, means that kids are measuring what they can’t see – just like chemists do!
I’ve taught this both before and after teaching the mole concept, and I’ve found it works better before. This is a great no chemical inquiry activity or teaching the mole concept.
7) Bubble Gum Hydrate
When I was student teaching I did the copper II sulfate pentahydrate dehydration and I LOVED it, but when I didn’t have a lab in my first year teaching I had to adjust. In came the bubble gum hydrate simulation. Kids weigh a piece of cheap bubble gum while it’s in the wrapper. That is the hydrate and the crucible. Then they chew the bubble gum to dissolve the sugar. That simulates heating the hydrate and evaporating the water. Then they weigh again after 15 to 20 minutes. The gum will have lost a fair amount of mass due to dissolving sugar. It has also gained mass due to saliva. The kids, again, get to evaluate the usefulness of these simulation labs when you point out the flaws. It makes a great point for discussion in their conclusion paragraphs. Read more details here.
8) Gram and Mole Conversions Lab
This no chemical lab can really be done as a kitchen chemistry lab activity. Here the students have to find the mass of a few different substances like water and salt. They also need to draw their name with chalk or a crayon and find out the number of moles of substance used. It’s a lot less lab and a lot more gram and mole conversion calculations. While it’s not an “investigation” it’s a great way for kids to test some lab skills like recording data and doing calculations. It really helps the kids to see the process and the necessity for converting into moles in the first place.
9) Phases of Matter
This phases of matter lab activity is one of my favorites no chemical labs, although it’s pretty messy. I make oobleck for the students, which is a mixture of cornstarch and water. Under a low pressure situation, it is able to flow like a liquid. But when the slightest bit of pressure is applied, the substance begins to act like a solid. You can get a good visual when you roll the cornstarch like a ball between your palms and then stop. The ball will almost melt apart. This lab allows my students to investigate the relationship between pressure and phase of matter. It’s filled with questions to get their minds going in the right direction. It’s really hard to see this relationship otherwise, especially because it primarily applies to gases.
10) Factors that Affect Solubility
The factors that affect solubility lab is super easy and one of my favorites simply for its simplicity. My students won’t actually learn the factors that affect solubility from me. They learn it in this inquiry lab. We test a few different variables – just one at a time. We dissolve sugar in water under different conditions. Sugar cube vs. granulated shows the factor of surface area. We also test temperature, stirring and concentration. This is also a great activity for physical science or even middle school students for the testing of variables, and learning you can only test one at a time. I originally did this no chemical chemistry lab in an old art classroom, so it’s super doable. Read more details here.

11) Freezing Point Depression
In this edible no chemical chemistry lab, students use the science of colligative properties to make ice cream in a ziplock bag. The kids make a sugar + milk mixture in a sandwich sized ziplock bag. That bag goes in a gallon bag full of ice and salt. The salt is going to drop the freezing point of the ice, making the heat of the milk rush there, freezing the milk mixture. The bag is shaken the whole time so that small air bubbles are caught in the frozen milk, so it comes out a nice soft serve consistency. It is seriously a crowd pleaser, and quite delicious. Add in toppings before shaking to make a cookies in cream or cookie dough type ice cream. Read more details here.

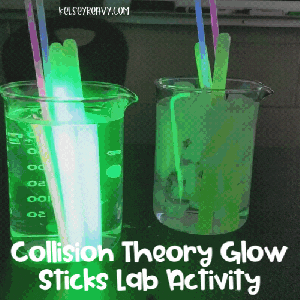
12) Collision Theory Glow Sticks
This lab just requires some glow sticks and warm and cold water. Even though chemicals are used in this lab, there’s really no exposure to the chemicals. Using a few different glow sticks, students test the reaction rate (brightness) under a few different conditions. We test skinny and fat glow sticks, we shake some and not others, and lastly we put those glow sticks in hot water and move them to cold and vice versa. It’s a really easy way to visualize reaction rate, where otherwise I find it very hard to do that. Read more details here.
13) Red Cabbage Indicator
This no chemical chemistry lab activity is super easy. Head to the grocery store for a red cabbage. Chop up a small amount and add to a beaker. Top with water and heat for fifteen to twenty minutes. Once the water is nice rich purple you can use it as an acid base indicator. Mix with substances of known pH to create a color chart. I usually use a pH of 1, 7 and 14 and one other acid and base. Then my students test some unknowns and compare them to their color chart. You could do this with some simple things, like vinegar and ammonia. Or bring in some random things from around your house and determine their pHs based on a color chart you’ve researched and found online. Either way, this can be as low or no chemical as you plan for. Read more details here.

14) Polymerization
I know that people have some strong opinions about Borax… I’m considering a “non-chemical” for the purposes of this blog post. If you have some glue, food coloring and a saturated borax solution, you can make a polymer! The borax solution is a catalyst that gets the monomers of the glue to link up and form a polymer. I really love the excitement that goes along with this lab. The kids love it.

I used to do this lab in bowls using spoons to mix, but I learned that you can do the entire synthesis in a ziplock bag. Which is great for a lot of reasons. Number one, the kids like to bring the slime home. And a ziplock is perfect for that. But also, that means I don’t have to put these kids’ play things in the potentially contaminated glassware. Plus it keeps my glassware safe from slime…
15) Half Life
This could be shaking a can of coins like an VERY intense game of Yahtzee or it could be Skittles. Up to you. Either way, you need a large number of two sided objects where the sides are marked or labeled so you know they’re different. Choose one side to represent radioisotopes that are still radioactive and the other for decayed and stable isotopes. This is why I like Skittles. S for “stable.”

Assign some amount of time to represent the half life. I don’t like to use a minute, because then the time elapsed is equal to the number of half lives passed. I usually pick 45 seconds. Shake the items until the time goes off. Then pour and split your “atoms” into radioactive and stable. It should be about half. I have my students graph this and we always get some great decay curves. If you do it under the right conditions, you can also eat the Skittles at the end of this no chemical lab!
You can get all of these labs and more (some are even more no chemical chemistry labs) in my year long lab manual. And in case you don’t already have one, sign up here to get a free copy of my lab rubric and outline.


